


1
Install the app from GooglePlay, AppStore.
If you use the app, you can connect to free Wi-Fi in addition to "TOKYO FREE Wi-Fi" in many locations such as the airport, train stations, and convenience stores.
See here if you would like to connect to free Wi-Fi by tapping in the app.
https://www.ntt-bp.net/jcfw/about/


Check here if you want to automatically connect to free Wi-Fi services!
https://www.ntt-bp.net/jw-auto/

This app lets you connect to free Wi-Fi anywhere in Japan simply by tapping the "Connect" button.
An internet connection is required for app installation and user registration. Do all preparations up to and including user registration in an internet connected environment.
Install the app from GooglePlay, AppStore.

Start the app, and tap the "Connect" button.

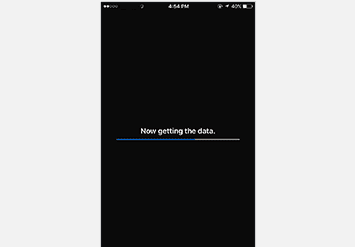
When your doing the initial startup, you will see the message "Now getting the data", and the latest data will be downloaded.
Agree to the Terms of Used and select the registration method.
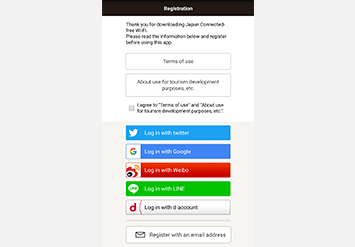
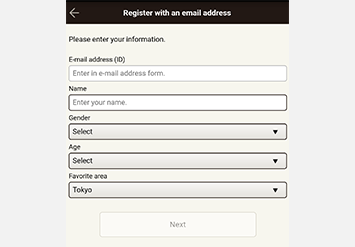
Enter the required information.
If you have registered using your email address:
An email containing the registration link will be sent to your registered email address.
※Please ensure that your settings have been configured to allow emails from the following domain:
@wifi-cloud.jp
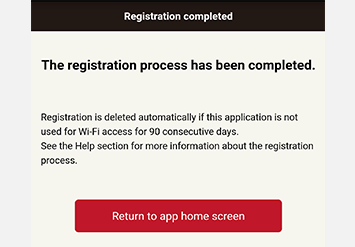
User registration will be completed. Tap Application Top", and you can start using the app.
Head to a free Wi-Fi spot.
Start the app, and tap the "Connect" button.
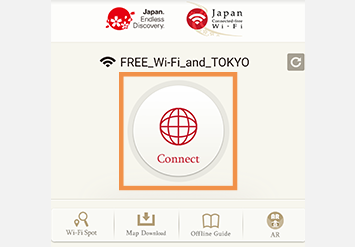
The app automatically turns the Wi-Fi settings "ON" on your device, and initiates a connection to "FREE_Wi-Fi_and_TOKYO".
Head to a free Wi-Fi spot.
Tap "Settings" on your smartphone or other mobile device.

Turn the Wi-Fi setting "ON", and then select "FREE_Wi-Fi_and_TOKYO" from the network list

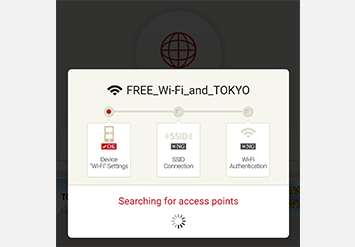
Start the app, and tap the "Connect" button.
The network name which you have just chosen will be displayed, make sure that the "Connect" button is displayed in red.
※ If the network name is different and the "Connect" button indicates "NG", tap the top right button to refresh the list.
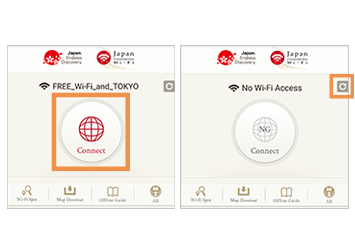
Tap the "Connect" button.

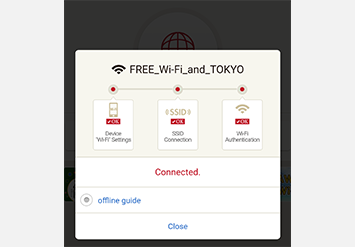
The connection to "FREE_Wi-Fi_and_TOKYO" will start.
This app automatically connects to free Wi-Fi hotspots throughout Japan. There is no need to configure anything at the hotspot!
The app automatically connects as soon as you arrive at a Wi-Fi hotspot, allowing you to start using the internet immediately.
An internet connection is required for app installation and user registration. Do all preparations up to and including user registration in an internet connected environment.
Install the app from GooglePlay, AppStore.
Start the app, and tap the "Connect" button.

When booting for the first time, Wi-Fi spot information and other details will be downloaded.
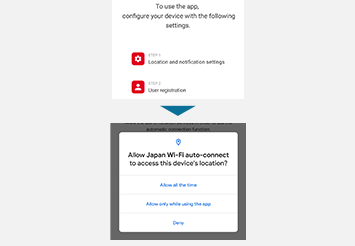
Select "Always Allow" or "Allow" if permission to access location information and notifications is requested from the device.
* Please be aware that this may vary based on OS limitations
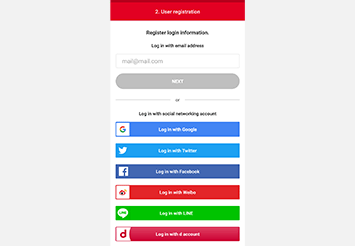
After accepting the Terms of Service, register your social media account or email address.
If you have registered your email address but do not receive the temporary registration email, please check your spam email folder, promotions folder, etc. If you have domain restrictions, please allow emails from @wifi-cloud.jp. If you have blocked emails with URLs or emails from PCs, please remove these settings.
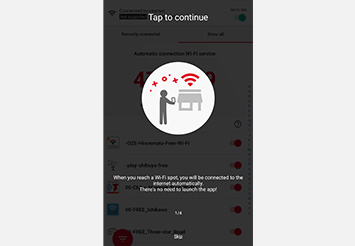
Registration is completed when the tutorial screen appears! The top screen will be displayed when the tutorial is finished.
Now going to Wi-Fi spot.
Be sure to leave your device's Wi-Fi set to "On" at all times.
The app connects when it arrives at a Wi-Fi spot. There is no need to start the app!
A notice is given when the app connects to the Internet.
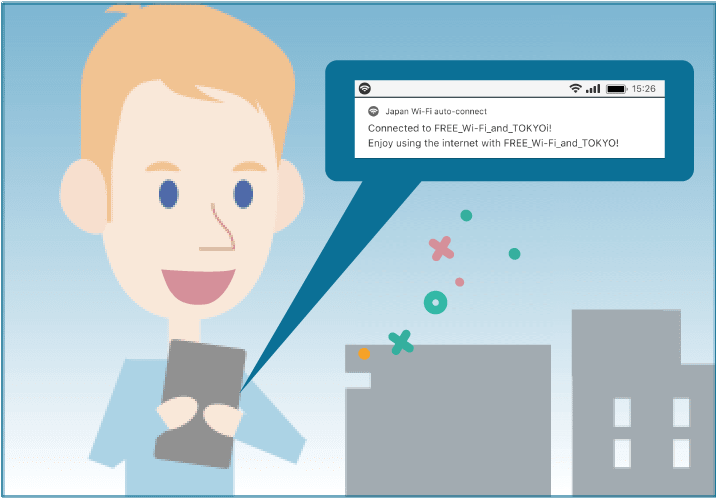
If you have never connected to the "FREE_Wi-Fi_and_TOKYO" network before, you will need to do so once.
It will connect automatically from your second use onwards.
Head to a free Wi-Fi spot.
Tap "Settings" on your smartphone or other mobile device.
Turn the Wi-Fi setting "ON", and then select "FREE_Wi-Fi_and_TOKYO" from the network list
This simply connects you to Wi-Fi. You don't need to open the app. You'll get a notification once you're connected.